Linux驱动学习day2
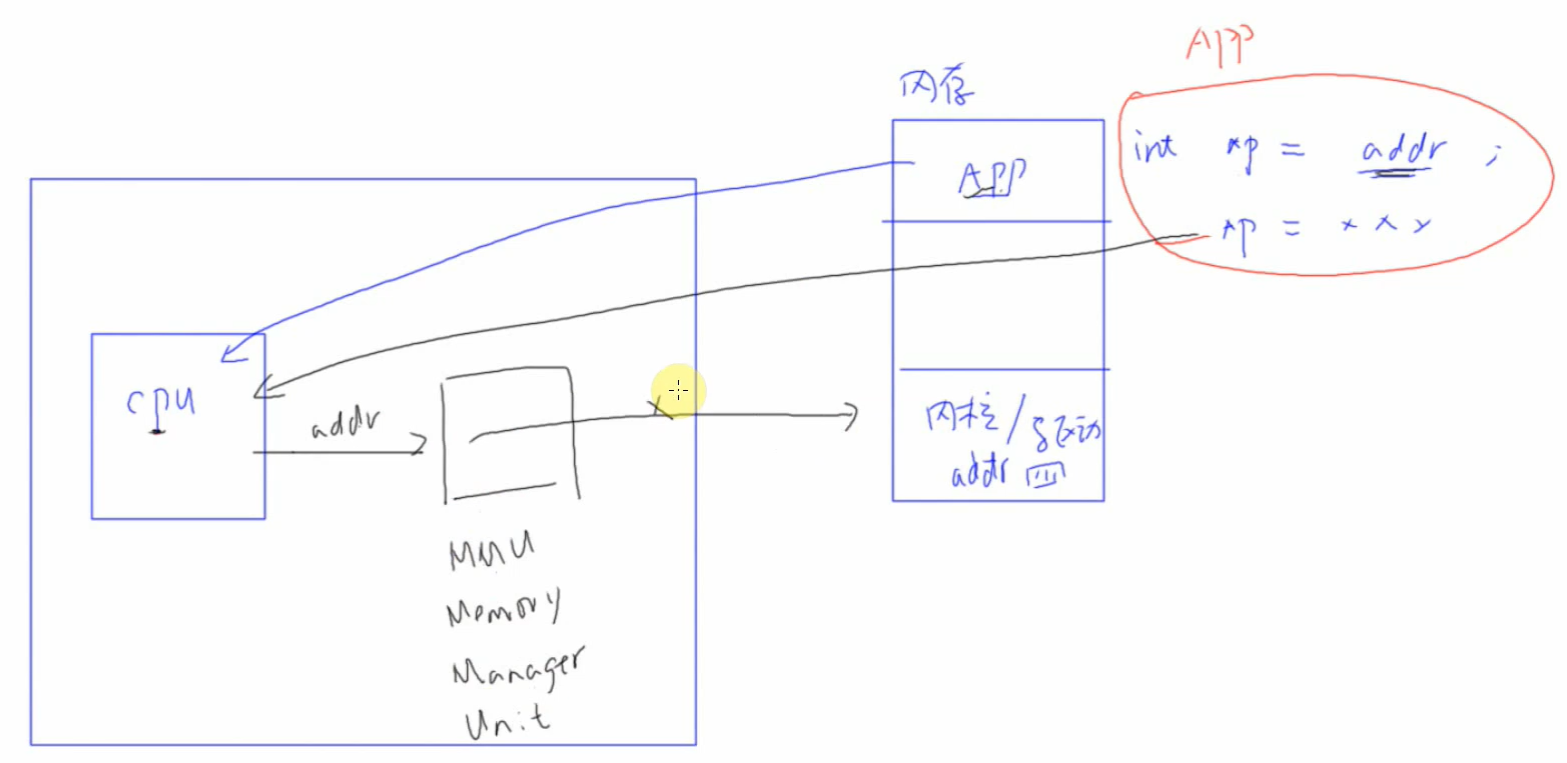
APP和驱动交互方式
app与驱动之间,通过下面两个函数交互数据
- copy_to_user
- copy_from_user
/* 函数原型 */
static inline unsigned long copy_from_user(void* to , const char* from , unsigned long n);static inline unsigned long copy_to_user(void* to , const char* from , unsigned long n);
驱动和硬件之间交互
- 可以使用各个子系统函数(iic and so on)
- 寄存器(但是Linux中不能直接使用addr ,要使用内存映射ioremap)
int *p = ioremap(addr , size);改进hello_drv.c驱动代码
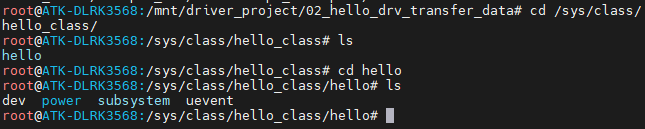
为了实现在开发板上能够自动生成nod,不需要使用mknod显示创建nod,在入口函数的时候创建类class_create , 并且注册设备device_create();下图是insmod hello_drv.ko之后的结果,可以cat dev,就能看到其驱动的主设备号和次设备号。

入口函数
/* register_chrdev */
static int __init hello_init(void)
{major = register_chrdev(0 , "hello_drv", &hello_drv);/* do not need mknod */hello_class = class_create(THIS_MODULE, "hello_class");if (IS_ERR(hello_class)) {printk("failed to allocate class\n");unregister_chrdev(major, "hello_class");return PTR_ERR(hello_class);}/* struct device *device_create(struct class *class, struct device *parent,dev_t devt, void *drvdata, const char *fmt, ...) */device_create(hello_class , NULL , MKDEV(major, 0) , NULL , "hello"); /* create node /dev/hello */return 0;
}
出口函数
/* entry function */
static void __exit  hello_exit(void)
{/* distroy void device_destroy(struct class *class, dev_t devt)*/device_destroy(hello_class , MKDEV(major, 0));class_destroy(hello_class);unregister_chrdev(major, "hello_drv");return;
}
#include <linux/module.h> // 最基本模块宏
#include <linux/kernel.h> // printk
#include <linux/init.h> // __init/__exit
#include <linux/fs.h> // register_chrdev 等
#include <linux/uaccess.h> // copy_to_user, copy_from_user
#include <linux/types.h> // dev_t, bool 等类型
#include <linux/device.h>static int major = 0;
static char hello_buf[100];static struct class *hello_class;/* funciton */static ssize_t hello_drv_read (struct file *file, char __user *buf , size_t size, loff_t * offset)
{unsigned long len = (size < 100 ? size : 100);//printk("%s %s %d\n" , __FILE__ , __FUNCTION__ , __LINE__);if(copy_to_user(buf, hello_buf, len) != 0){printk("copy_to_user error\n");return -1;}printk("read from drivers:%s %s %s\n" , __FILE__ , __FUNCTION__ , hello_buf);return len;
}static ssize_t hello_drv_write (struct file *file, const char __user *buf , size_t size, loff_t * offset)
{unsigned long len = (size < 100 ? size : 100);// printk("%s %s %d\n" , __FILE__ , __FUNCTION__ , __LINE__);if(copy_from_user(hello_buf, buf, len) != 0){printk("copy_from_user error\n");return -1;}printk("write from user:%s %s %s\n" , __FILE__ , __FUNCTION__ , hello_buf);return len;
}static int hello_drv_open (struct inode *node, struct file *file)
{// printk("%s %s %d\n" , __FILE__ , __FUNCTION__ , __LINE__);return 0;
}static int hello_drv_close (struct inode *node, struct file *file)
{// printk("%s %s %d\n" , __FILE__ , __FUNCTION__ , __LINE__);return 0;
}/* create struct file_operations */
static struct file_operations hello_drv =
{.owner = THIS_MODULE,.open = hello_drv_open,.read = hello_drv_read,.write = hello_drv_write,.release = hello_drv_close,
};/* register_chrdev */
static int __init hello_init(void)
{major = register_chrdev(0 , "hello_drv", &hello_drv);/* do not need mknod */hello_class = class_create(THIS_MODULE, "hello_class");if (IS_ERR(hello_class)) {printk("failed to allocate class\n");unregister_chrdev(major, "hello_class");return PTR_ERR(hello_class);}/* struct device *device_create(struct class *class, struct device *parent,dev_t devt, void *drvdata, const char *fmt, ...) */device_create(hello_class , NULL , MKDEV(major, 0) , NULL , "hello"); /* create node /dev/hello */return 0;
}/* entry function */
static void __exit hello_exit(void)
{/* distroy void device_destroy(struct class *class, dev_t devt)*/device_destroy(hello_class , MKDEV(major, 0));class_destroy(hello_class);unregister_chrdev(major, "hello_drv");return;
}module_init(hello_init);
module_exit(hello_exit);
MODULE_LICENSE("GPL");
使用命令echo "4 4 1 7" > /proc/sys/kernel/printk,可以取消掉内核驱动的打印。
使用命令echo "7 4 1 7" > /proc/sys/kernel/printk,可以开启内核驱动的打印。

从上图结果看,可以成功写入驱动并且读出来。成功!